New Website Launch – Toemat Labs

X-INfERNO.com has enjoyed a 12+ year journey through some of the most interesting times in the history of the web. It’s served different purposes along the way – software and game host, online social hub,  and project blog among other things. It’s been a great run but it’s time for a new platform and a new brand and so I’d like to introduce to you, Toemat Labs at http://toemat.com.

Toemat Labs is the spiritual successor to X-INfERNO.com and will continue on the path of documenting projects and experiments with an emphasis on useful, fun, and high quality content. I’d love for you to take a look at a couple of the first posts and let me know what you think, for example the Immersion RC Vortex Teardown or the Arduino Bubble Blaster!

Legacy X-INfERNO

I launched X-INfERNO.com sometime around 2002, at the time I was just about midway through high school. It was my first domain and my first ‘serious’ website (my very first piece of the web was at Angelfire around the year 2000, but sadly it’s lost to history).

I didn’t have a credit card, or really any money to speak of, but I was able to register x-inferno.com through a website called NameZero, where domains could be registered for free as long as you agreed to allow them to inject a big advertisement banner. Of course the first thing I did was remove the banner.

file

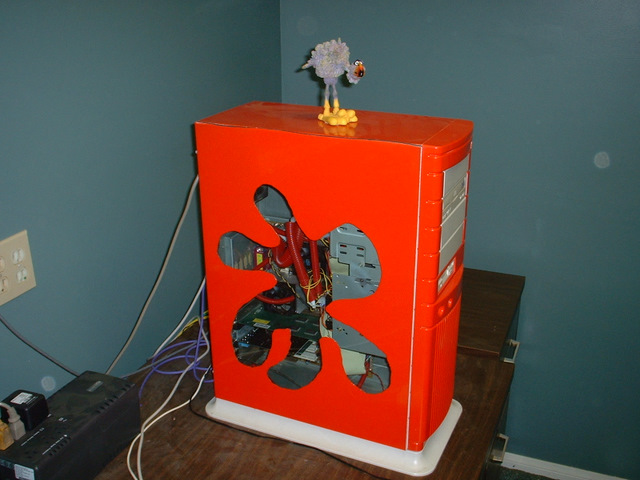
The first machine running X-INfERNO.com was a dual CPU 1.0GHz monster we called the Orange Box. The case was a school district throw-away full tower which I painted and cut a window into. It was connected to the world wide web by a fantastically unreliable 20kB/s DSL line. It wasn’t much but it did the job and ran 24/7 without issue for a number of years.

Originally the site was made using FrontPage (yuck), then it was Joomla (ugh), and finally WordPress.

The highlight, for me, was the X-INfERNO.com forum. An online hub for a group of real life friends to communicate and share memories. It collected thousands of posts over the years and a lot of great times are documented there. As time has moved on other services online have taken it’s place, but the forum will live on as a window into the lives of a bunch of teenage millennials trying to find their place in a world of constantly changing technology.

Thanks for reading. Here’s to a new chapter at Toemat.com 🍷

Setting up Naze32 with GPS and OSD

I’m in the process of building a tricopter for long distance exploration and decided to go with the Naze32 flight controller paired with GPS and the RCTimer MAVLink OSD (which is just a hardware variant of minimOSD). I’ve got everything up and running now and it’s an awesome combo, but to do so I had to dig through a mountain of forum posts and videos to understand how to set everything up. I’m writing this post to compile some of my ah ha! moments to hopefully help you out with your setup!

Before I start, there are a couple of videos by Mochaboy RC that were incredibly useful in this process and they are How to setup a Naze32 Acro / Funfly Flight Controller and How to Setup KV OSD MinimOSD Naze32, without these I would not have been able to get anything working!

Continue reading

Tricopter Part I: Building a Basic Wooden Frame

Postal box tricopter

It was about a year and a half ago that I became interested in multirotor helicopters, around that time I set out to design and build my own basic tricopter. This series of posts will explore my journey of building, crashing, modifying, learning and iterating. The process has been exciting, I’ve learned a lot, and it’s become one of my longest running projects to date! Read on if you’re interested in multirotor, building things, or if you want to know what the heck the photo above is all about! Continue reading

Using OpenLRS with a Hitec Aurora 9

aurora tx module model

Recently I’ve become interested in the R/C FPV scene and all things multirotor. My ongoing project for the last few months has been a DIY tricopter multirotor that I fly FPV with. The tricopter I’ve built has been through more iterations than any other project I’ve done and has been great fun! I’m always trying to improve it’s flight characteristics and range and most recently that has meant swapping out my Hitec 2.4Ghz controls for a UHF Long Range System.

Before doing this my controls was the limiting factor on range, the 1000mW video link I use can go much further, so that started the hunt for a low cost UHF LRS I could use with my existing Hitec Aurora 9 transmitter. The lowest cost LRS I could find was the Orange RX OpenLRS combo that’s sold on HobbyKing.com. For US$50 you can get a transmitter and receiver based on the OpenLRS hardware, but unfortunitly the transmitter module is not made for Hitec and is way too big to fit.

That’s where the AutoCAD model above, and a 3d printer comes in! I created a model of my existing 2.4Ghz transmitter module so that I could remotely connect it to the OrangeRX OpenLRS transmitter from HobbyKing. This new printed module snaps in to the back of the Aurora 9.

2013-04-12 19.55.20

Here’s the module with the lid Continue reading

Long range video surveillance robot

The title of this post isn’t entirely accurate. It’s more of a very strange remotely controlled vehicle, a kind of land drone. You’re probably wondering why it’s made out of a shipping box, well here’s what happened… I bought a 1000mw wireless video transmitter with the intention of learning about it and eventually putting it on an RC plane to fly around. It was shipped to me in that very USPS box pictured above. The first thing I wanted to do was power it up and see how long the range was, of course! So I taped all the components to the top of the box so they would stay together and handed it to +Steve Melton who then proceeded to run far away while I watched the video feed. The camera works great, it gives a good picture for quite a long distance (tested to 1900 feet on flat open ground) and is resistant to objects in the way like buildings and trees.

Continue reading for all the details and a video of it in action!
Continue reading

Ethernet controlled garage door


I just finished installing an electric opener on a big steel roll-up door so that we can park our car inside, away from the dirt and sun! But since it is an old industrial opener there was no way to open it remotely, like from inside the car. The photo above is my finished circuit board for controlling the door via ethernet.

It uses the MICROCHIP ENC28j60 Stand-alone Ethernet Controller. This project is an attempt to make a low-cost generic ethernet-attached relay box with a web interface. It will allow me to control physical devices from my iPhone or any internet connected device with a browser. It can control things like the garage door, air compressor, exhaust fans, or basically anything else that can be switched on and off.

Continue reading for all the details, photos, and a video of it in action!

Continue reading

Bomb Timer Movie Prop


A friend of mine was asked to make a prop that looked like a home made bomb for a movie that was being produced. I helped out by designing and building the countdown timer display circuit. As you can see it has a bit of a home made look to it, which is what the director was looking for to fit within the context of the story.


This project used parts I got from Digikey and Sparkfun. It’s built on two separate pieces of perfboard and uses only two ICs to operate the display, a LED Display Driver (MAX7219) and an Atmel ATTiny4313. Click continue reading for more photos, descriptions, and a video of the finished timer!
Continue reading

WordPress plugin: Completely Random Widget


During the process of (re)building this site in WordPress I was trying to come up with ideas for the sidebar. I used to have a widget that showed a random image from a folder, which was cool but a little limited. What if it could be expanded to pull an image from the entire internet? Introducing the Completely Random Widget. This is the first project I have submitted to the WordPress Plugin Directory. You can see it in action on the sidebar of this site. In essence it is a sidebar widget that uses Google images to find a totally random image from the web and display it on your site. You can check it out it’s page in the Plugin Directory, give it a try on your site! This site is running a custom version that archives each image that gets displayed, and I’ve set up a Random Image Archive Page so you can see every image that the widget has ever displayed on this site! Give this plugin a try and let me know what you think!

Embed YouTube videos as HD

[UPDATE: I’ve updated this post and it is working as of 3/7/2014]

Recently I was helping out with the Customer Dish learning center where we needed to embed some HD YouTube videos. We wanted to embed them as HD so the user did not have to hit play and then select the better quality. Turns out the hd=1 option does not work anymore, the new player automatically selects the ‘best’ resolution for the size of the embed, which is 480p or lower when your embed size is less than about 850px wide.

But there’s good news! There’s a parameter you can add to the embed code to preselect which resolution to play at. The user still has the option to change it but it will start playing at the preselected value.

Here’s how:

  1. Go to Share -> Embed on the video page
  2. Look for ?rel=0 in the src attribute of the embed code
  3. Add &vq=hd720 or &vq=hd1080 after ?rel=0
  4. Should look something like: src=”//www.youtube.com/embed/IA0pVPkBHjo?rel=0&vq=hd720

Now you should be good to go! Your videos will load in HD automatically and also have a full screen button.